Showing posts with label house. Show all posts

Thursday, March 19, 2009

Master Closet Spring Cleaning....

I knew I wanted to do this after winter, so we could get a little more organized and remove coats and sweaters in our walk-in in the Master. Not to mention we needed to do something about the HORRENDOUS pink carpet that was in there! It was matted down and beyond dirty (despite many shampooing attempts). So Joel pulled up the carpet and laid down some of the leftover floors, and we will just have to buy another $50 worth of flooring to finish the project. It looks so great and SO much cleaner! Here is once side the has been completed so far....

BEFORE:


AFTER!!

Monday, March 16, 2009

AHHH.....Spring Cleaning.

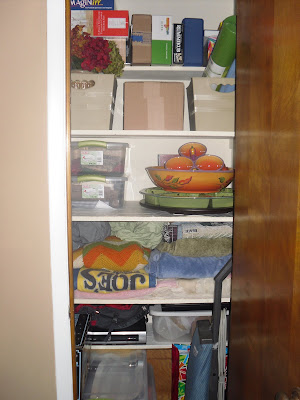
I personally love Spring Cleaning because I take on soo many crafts, home improvement projects and parties that I tend to accumulate so much stuff! Yesterday, I tackled the hallway closet, my fabric collection and the junk drawer in the kitchen. It feels so good to get it all done! I used 2 HUGE black trash bags and filled them up with junk to throw away. Then, I picked up a bunch of plastic storage bins and threw all my fabric from the office in them. SO now, I have cleared room in the office, and have consolidated all my things (including the vacuum which never fit before) into ONE closet! YAY! Next Spring Cleaning project for the week is our Master Closet (which we will also be putting the leftover hardwood floors in).

AND AFTER!!

Friday, March 13, 2009

More floors

Here are the finished floors through the entryway. The quarter round molding still needs to be installed, but it is looking SO good! Joel did the best job with the entryway....it was really tricky!

VIEW FROM BACK DOOR:

VIEW FROM FRONT DOOR:

Also, here are the two silhouette paintings of the pups....they turned out pretty cute!

Wednesday, March 11, 2009

HARDWOODS!!!!!!

I am so happy to finally have hardwood floors! I have wanting these since the day I first looked at the house with my realtor. The carpet was old and bland. Off white, dirty, dusty and just BLAH. We have 2 dogs that have been potty trained in the house too- so that didn't help at all.

We went to Home Depot Clearance Outlet (yep, they have those!) and bought these great engineered hardwood floors. It is a "floating" floor, so there was no nailing or stapling. Patty and Joel once again came to the rescue and ripped up all our carpets, cleaned the floors and prepped them for the hardwoods. Last Saturday Jeff, his Dad, and his brother worked ALL DAY LONG while Patty and I did yard work. They came across a few rough areas, but in the end, it was done and it looks amazing! I can't believe the difference. They are not totally complete, but I will update as we go along. Here are some 'before and afters' to give you a sense of what we were dealing with. The before pics are from the first month in the house, so the furniture has changed along the way, not just with the floors. ENJOY!


GREAT ROOM BEFORE:

GREAT ROOM AFTER!

DINING ROOM BEFORE:


DINING ROOM AFTER!

Front Porch Makeover!

Now this is a little trick that everyone should keep in their arsenal. You know how I think a little paint can do anything- well, this is proof! My front porch is ROUGH to say the least. 35 years of wear and tear on this puppy were starting to show, and instead of replacing it, we needed a quick fix. So this past weekend, after a trip to the paint department at Lowe's and Depot and a day of painting by Patty and I, we have a brand new (looking) front porch!! We did the "color match" through Valspar paint with a piece of siding from our house, so we have the exact color as the siding (for the railing) and were able to use that extra paint to cover blemishes and re-paint the door frame to brighten it up. I think it looks so much cleaner...

FRONT PORCH (TOP) BEFORE:


FRONT PORCH (TOP) AFTER!


FULL VIEW BEFORE:


FULL VIEW AFTER:

My First Attempt at Tiling....

Before Jeff moved in, I lived upstairs in the Bonus Room (pics still to come). It has an adjoining bathroom upstairs which was part of the new addition to the house in the 90s, and actually has a fairly new vanity! Shocker! However, it also had a horrible plastic bath/shower combo that just HAD to go. I have always wanted a jetted tub, so I found one cheapo at Depot, and had a contractor install it and hook up the electrical. Here is what we were left with after the install:

UPSTAIRS BATH BEFORE:

Now the hard part, TILING! It was pretty rough, and I made it harder on myself than it needed to be. My Mom started it off and told me what to do, then I finished it and added the grout.....and left it on overnight- OOPS! So, Jeff and I spent our Friday night chipping away hardened grout off the tiles. In the end it looked great, but it could have been much easier. Word to the wise, always sponge off the grout after you apply. I've learned my lesson.

TILING THE SHOWER:


The walls were a mess afterwards, so I decided to install beadboard and found an easy click and lock plastic version that is stain resistant and not hard to install. I also painted the walls to make it a little happier and brighter in there. Here is the before and the final after shot!


BEADBOARD APPLICATION AND FINISHED PRODUCT!


The Johnson's Save The Day!

I can't tell you how lucky I am to have these 2 people in my life. They bend over backwards for Jeff and I on a regular basis, and are the most hardworking people I know. Originally, we had a big screened in porch that look great at first glance, but little did we know, the previous owners had covered the rotting floor on the porch with carpet. Once that had gotten soiled and
full of dog hair, we ripped it up and found the deck was barely usable. Here are some before photos of the carpet, then the rotting wood underneath. Ewwww.

DECK BEFORE:

THE ROOF IS OFF, STILL OLD BOARDS:


So, the Johnsons came to Georgia for an extended stay and said that they would rip it down and build us the new OPEN deck that we had always dreamed of! The kicker is- they had never built a deck before! Not to mention, siding had to be replaced where the roof was ripped off. They worked SO hard for months, and it looks amazing! These are some pics of the finished product!!


My Favorite Room in the House

I am really excited about this room!! It's my favorite room in the house, and where I spend the most time. I couldn't stand working in my kitchen until I made this quick and easy update. First of all, I was working with the original appliances from 1973- yikes! Only 2 burners worked, and the oven cooked at a faster rate, so baking was not even an option (good thing I don't have a sweet tooth). The thing that bothered me the most were the awful original brown wood cabinets. That wood was the same color on every baseboard and door and vanity that I worked so hard to paint, so I couldn't stand it anymore! Here is the horrendous before:

KITCHEN BEFORE:
I even forgot to mention the floors! They were white linoleum, and you could see every ounce of dirt. I tried my best to make the room look cute, but to no avail. SOOO, I took a huge risk and primed and painted the cabinets black ($20) to go with my 'bistro' theme, changed the hardware to chrome Ikea knobs (I think they were $1.99/pack of 4), and installed inexpensive track lighting from Depot. Then added an island for prep work, laid linoleum tiles that were beige and didn't show dirt, and bought new appliances. The appliances were definitely a splurge but TOTALLY worth it! After all, kitchens sell houses! Check this out:

KITCHEN AFTER!

Then I wanted to get rid of my old table and buy something more up to date, so I found this one at Big Lots for a really good deal. After some finishing touches, here is the breakfast nook.
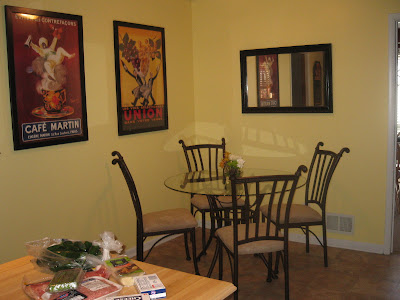


Can you see why this is my favorite??!?


Tuesday, March 10, 2009

It's AMAZING what a little paint can do!

I knew when I started this blog that this would be one of my favorite subjects. I think people always underestimate the power of paint. It can transform ugly walls, furniture, and cabinets and make them look brand new (and much cleaner!). I have painted every single room in the house, every baseboard, doorway, door, the front porch, two bathroom vanities, and my kitchen cabinets (you'll have to wait for that one- it's the best!). It has made a world of difference in every room. The best part is, you can start all over again if you hate the color! It's one home improvement project that can be redone for under $20- every time. Right now I am researching how to paint my guest bathroom countertops- so stayed tuned for that one! Here are the 'before and after' Master Bath and Guest Bath Vanities after a quart of paint and some new hardware....

MASTER VANITY BEFORE:


MASTER VANITY AFTER!


GUEST VANITY BEFORE:


GUEST VANITY AFTER!


The Office

Over the past two years, this office has been a few different things. It started off as a "Clemson Office" with bright orange walls (what was I thinking?!?!), then changed colors to pale green and it became Tiay's room for a year. Now, once again, it is an office where Jeff stations himself when he works from home, and has also turned into my sewing nook. We researched colors, and found that Yellow stimulates your brain....so we decided to go with that. I wanted to make it look a little formal, so I made a makeshift chair rail with some molding and semi-gloss white paint. It is such an inexpensive alternative to wainscoting and looks just as good! Here are pics of the office that has been transformed MANY times. I think we finally got it right :)
CLEMSON DEDICATION:

AS TIAY'S BEDROOM:

FINALLY, OUR OFFICE!

Master Bedroom

This was actually a really fun project, because it was going to be the first room I shared with a boy! I needed to get creative so that the room was decorated for BOTH sexes. I knew that Jeff and I love the blue/brown color combo, so we went with that. I also knew that the bed should be moved under the big window in the room and dressed up with huge curtains. Just like the rest of the house, all of the doors and baseboards had to be painted white. The ceiling fan was ancient, so my sister and I hung a chandelier to give it a romantic feel. Picked up a great loveseat from Overstock.com and accessories from Target and it all fell into place. Here are some pics!

MASTER BEDROOM BEFORE:

MASTER BEDROOM AFTER: